Tuesday, June 9, 2009
Lemon Cookies to soothe my soul
So, the first "free" moment I had....I landed myself in the kitchen.....baking lemon sandwich cookies. YUM!
These were easy to make and they are delicious! If you like lemon (or love it...the way we do), you'll definitely have to try these. If you don't like rolling dough into a log, you could easily roll it out flat and use a cookie cutter. If that isn't your thing either, you could just roll the dough into balls in your hands and flatten with a glass dipped in sugar. Either method should warrant great (and yummy) results.
Lemon Sandwich Cookies
16 tablespoons (2 sticks) unsalted butter, room temperature
1 cup confectioners' sugar
1 tablespoon finely grated lemon zest (from 1 lemon)
1/2 teaspoon salt
2 cups all-purpose flour, sifted
Icing (filling)
8 oz. cream cheese
1 tsp lemon extract
1 cup powdered sugar (I used a little more than this, but you can do it to your desired consistency)
Directions
Preheat oven to 350 degrees. In a large bowl using an electric mixer on high speed, beat butter, confectioners' sugar, lemon zest, and salt until combined. With mixer on low, add flour (dough will still be stiff and somewhat crumbly); finish mixing with a wooden spoon.
Turn half of the dough onto a piece of foil or plastic wrap, bring two opposite edges of the foil up and form a log. (Repeat with second half of dough) Wrap, and chill until firm, about 1 hour (and up to 3 days).
Unwrap dough; cut into 1/4" slices. Place 1 inch apart on two baking sheets; sprinkle with granulated sugar, if desired. Bake until barely beginning to brown, 15 to 20 minutes; transfer to wire racks to cool completely.
While your cookies are cooling, you can make the filling/icing. Mix ingredients together until desired consistency.
Form sandwiches: Place about 1 teaspoon filling between two cookies, sugared sides facing out; squeeze gently.
I ended up getting about 20 sandwiches out of this recipe.....though I rolled my dough pretty fat/thick, so if you made longer, skinnier logs, you could easily get more than that....but we like big, fat cookies!
Enjoy!
-Erica
Monday, May 25, 2009
Lunchbox Brownies
Lunchbox brownies are not too cakey so that they go stale, but they're not too fudgy so that they make a huge mess. They sit comfortably in the middle. Evidently, the middle is good.
According to my hubby (self-renowned foodie) these are just the very best brownies he has ever put in his belly. He actually demanded that I make another batch "as soon as possible.....which means today" (since the first batch is already gone, partly due to him and partly due to our Family celebration yesterday)
This is his first brownie from this batch. My hubby loves whipped cream, can you tell?
Now, I did follow the recipe exactly.....until it came to the "additions". I threw in (no kind of actual measurement) some milk chocolate chips, white chocolate chips, and a little chopped pecan. Yummy.
This recipe was super easy to make and pretty quick. It makes a full 9 X 13 pan, so enough to go around a decent size crowd (or a couple of serious brownie lovers). They aren't too rich that you have to eat a teeny piece, but they're fudgy enough to satisfy the chocolate lover. A really good and happy medium.
Wanna make them? Here ya go:
Lunchbox Brownies
1 1/2 C flour
1 tsp baking powder
1 tsp salt
2 sticks unsalted butter, at room temperature
4 oz unsweetened chocolate
2 C sugar
3 large eggs, at room temperature
1 tsp vanilla
1. Preheat the oven to 350 F. Generously butter a 9 X 13 pan; set it aside
2. In a medium bowl, whisk the flour, powder, and salt until well combined. Set aside
3. Place the butter and chocolate in a bowl and put in microwave for 30 seconds. Stir and repeat at 15 second intervals until chocolate is completely melted. Transfer the mixture to a large bowl and allow it to cool for 5 minutes. (You can also use a double boiler to melt the chocolate and butter together, if you prefer)
4. Beat the sugar into the chocolate mixture with a whisk or with an electric mixer at medium speed (I recommend the electric mixer, you'll see why in just a second); continue beating until the mixture is well-blended. (About 6 minutes by hand or 3 minutes with the mixer) Beat in the eggs one at a time, allowing each to be thoroughly incorporated before adding the next. After beating in the third egg for 1 minute, beat in the vanilla.
5. With a wooden spoon or rubber spatula, stir in the flour mixture just until incorporated. Do not beat, although the batter will be very thick. Spoon the batter into the prepared pan, spreading it gently to the corners.
6. Bake for 30 minutes, or until a toothpick or cake tester comes out with a few moist crumbs attached. Set the pan on a wire rack and allow to cool for 30 min - 1 hour.
7. Cut and serve. This will make 24 - 2 1/4 X 2 1/8 brownies.
*After cooling completely, you can wrap with plastic wrap and they'll stay fresh for up to 2 days. If you wrap them (individually) tightly with wax paper and seal in a freezer-safe bag, they can freeze for up to 4 months (allow them to thaw at room temperature before serving).
**To vary this recipe:
Whisk one of the following spices into the flour mixture - 2 tsp cinnamon; 1 tsp ground mace.
Add one of the following flavorings with the vanilla - 2 tsp banana extract; 2 tsp orange extract; 1 1/2 tsp maple extract.
Stir in 1 1/4 C of any of the following mix-ins (or 1 1/4 C of any combination of the following) with the flour mixture - chopped candy bars; honey-roasted walnuts; chopped malted milk balls; chopped pecans; chopped hazelnuts; cocoa nibs; crumbled Oreo cookies; dried blueberries; dried cranberries; milk chocolate chips; peanut butter chips; white chocolate chips; pinenuts; Raisinets; shredded coconut; shelled sunflower seeds; plain or chocolate-covered espresso beans; or just about anything you love!
I leave you with a bite:
If you feel like sharing....I'd love to know what makes your ultimate brownie? Fudgy? Cakey? What do you like in your brownies?
Enjoy!
-Erica
PS) Don't forget to enter to win Junior's Cheesecake Cookbook here.
Sunday, May 24, 2009
The best Blueberry Muffins
Blueberry Muffins with Pecans
Delicious. Trust me. The best blueberry muffins....ever.
First, I don't think I've ever had a blueberry muffin with pecans in them. Another thing, these babies have another addition - a brown sugar surprise....baked in. Yummy.
The recipe I found didn't say how many muffins would be made, but I was able to get 12 regular size muffins and this cute little ring, too.
The ring would serve another 4 - 5 people, I'd say. Though, if you wanted to stick to all muffins, you could easily get 15 - 17 muffins out of the batter.
The inside is so wonderful! Baked to perfection, honestly. There is a nice blend of cinnamon with blueberry and pecan. Wanna see the inside? Here, I tore a piece of the ring just for you:
See that pecan? See the yummy blueberries. Delightful.
Wanna try them at your house? Here you go baby:
Blueberry Pecan Muffins with Brown Sugar
2 C flour
1 C sugar
1 tsp baking soda
1 tsp cinnamon
1/4 tsp salt
1/2 C chopped pecans
1 C buttermilk
1/2 C oil
1 Xtra lg egg
1/2 tsp vanilla
1 C blueberries
Preheat oven to 375 F
Combine flour, sugar, soda, cinnamon, salt, and pecans in large bowl
Whisk buttermilk, oil, egg, and vanilla in small bowl. Add wet ingredients to dry ingredients. Stir just until combined. Gently fold in blueberries. Refrigerate batter for 10 minutes before scooping into the muffin liners.
Mix 1/2 C packed dark brown sugar, 1 Tbsp flour, and 1 Tbsp softened butter with fork until crumbly. Sprinkle about 1 tsp over each muffin. Top with additional pecans (if desired).
Bake muffins for about 20 minutes or until toothpick test is clean. Cool on a wire rack. Serve warm or cold.
*The brown sugar mixture will sink into the muffins and create little pockets of deliciousness. You could easily skip that step if you don't want the pockets.*
Enjoy!
-Erica
PS) Don't forget to enter to win Junior's Cheesecake Cookbook here.
Saturday, May 23, 2009
Mmmm - Cheesecake
Cheesecake can make me happy after a horrible day. Cheesecake can make me smile while I'm crying. Cheesecake makes me feel loved. There. I said it. Eating cheesecake makes me feel loved. So, it is only right that I love it back, right?
Well, no matter which side of the fence you're on for that one, I'm sure you'll love this:

Peanut Butter Swirl Cheesecake
This, my friends, is like eating a little (or giant, either way is fine with me) piece of Heaven! Now, as much as I love cheesecake....I love peanut butter, too. Putting the two together is, well, I'm at a loss for words, honestly. It was just fabulous!
*Just a small note from me: The recipe called for 2 cups of peanut butter for the swirls. I followed it exactly and ended up with close to 1 cup of it left over. So, the next time I make this particular recipe, I'll be cutting that part in half. Otherwise I think it would be way too overpowering, but that's just me.*
Not to mention....did you notice that there is not a "normal" cheesecake crust on that baby? Nope, that is SPONGE CAKE for the base! Yeah, I thought that might be a little weird, too, but NOPE! Delicious! Really.
All that topped with whipped cream, drizzled with peanut butter topping, and sprinkled with some milk chocolate chips. Absolutely delightful. Mmmmm.
I came across this book: Junior's Cheesecake Cookbook and had to buy it! Well, I have some seriously fabulous news for all of you.....I love this book so much that I want you to have it, too! (Well, at least one of you)
So, here is another giveaway for all my wonderfully gorgeous (yeah, I don't mind a little butt-kissing every now and then) readers, my friends. There are 50 To-Die-For Recipes for New York-Style Cheesecake found in this book. Awesome.
From the Peanut Butter Swirl to Pumpkin Swirl. From Key Lime Mousse Cheesecake to Creme de Menthe Cheesecake. Even Tiramisu Cheesecake!
Alright, alright....I know you're sitting on the edge of your chair wondering how you're going to get to enter this giveaway, right? Well, here ya go:
Please leave a separate comment for each entry. Thanks!
1 - Leave a comment and tell me what your favorite kind of cheesecake is (mandatory)
2 - Follow my blog (or just post if you're already a follower)
3 - Follow me on Twitter (see right-hand column for a button)
4 - Twitter about this giveaway (leave me either a permalink or your user name)
5 - Blog about this giveaway (leave me a link)
*You can tweet once daily and post each time you do for extra entries*
Please be sure to leave your e-mail address or that your profile has your e-mail address accessible. Thanks!
Comments for the giveaway will be accepted through May 31st at 8 PM Eastern. Winner will be announced shortly there after.
For now, I leave you with a nibble:

Enjoy!
-Erica
PS) I'll post the recipe soon for those of you who'll be wanting to try this out!
Thursday, May 7, 2009
Caramel-Maple Popcorn (for the FBI)
Sweet. Salty. Crunchy. Clusters of Heaven.
Recently I came across this site that is in charge of the FBI (Food Blog Inspection). It sounded like a really fun thing to do....and so, I have made Caramel-Maple Popcorn for the FBI as my initiation.
I've never even made regular caramel popcorn before (though I really like it....especially the "Crunch N Munch" version....Mmmmmm), so I was excited to try this. My hubby is in love with maple syrup, really. Once I even spied him taking a little sip after drowning his pancakes in it. (Shhh - don't tell him I told you. That was supposed to be a private moment for him) He is at work right now, but he sure is going to be happy when he arrives home tonight.
This was a really easy treat to create....so don't hesitate to try it at home!
I started with some popped popcorn and mixed in pecan pieces:

Then I made the caramel-maple mixture and poured it right over the top:

Good thing I knew this stuff was super hot, otherwise, I'd have stuck my finger right in there and had a taste!
Then, you just mix it all around and spread it out on a pan (I used my new handy-dandy paella pan....LOVE IT!) and wait for it to cool.

Pure goodness! This stuff is awesome....and what is even more awesome, it took me all of 15 minutes from start to finish!
This month's inspection is of Culinary in the Desert Country.
The recipe I recreated was Maple Caramel Popcorn Crunch. I had a lot of fun and look forward to doing it again each month!
Enjoy!
-Erica
Sunday, May 3, 2009
Black Cherry Cuppies
Here they are:

The inside of these guys are:

Kinda purple-y....pretty.
Now, these were more my speed. The Black Cherry soda wasn't very strong in these cuppies. You could tell they weren't just "regular yellow" cuppies, but if I didn't tell you they were black cherry, you probably wouldn't have guessed that.
Still yummy, though!
Again, you can find the recipe here.
Enjoy!
-Erica
Watermelon Cuppies
Anyhoo.....I seen Watermelon Jolly Rancher soda and thought, "Why couldn't I find that last month?" IronCupcake: Earth had the soda challenge last month! Well, I just couldn't pass it up!
I give you Watermelon Cuppies:

Delish! The vanilla buttercream is infused with Watermelon soda, too! Then those little sprinkles just top it off....perfect.
These tasted interesting to me. I'm not a huge fan of Watermelon flavoring. I like it, just don't LOVE it. The cuppies tasted of a great deal of Watermelon....so my daughter LOVED them! My hubby will, too. He ate one before I even got the icing and sprinkles on. *smile*
The inside is pink:

I used the same recipe from here.
Enjoy!
-Erica
Tuesday, April 28, 2009
Peppermint Patties - Homemade

So, I was feeling like I needed some time in the kitchen today....just the two of us. We're best friends, you know? I went to my shelf and picked out a book that I haven't used yet. Sweet Temptation by Nicki Trench. To be honest with you, I was a little disappointed after getting this book. I'm not a fan of fondant, never have been. This book uses a LOT of fondant....therefore has a LOT of recipes I'll never use. None-the-less, I have the book and wanted to use it.
I decided to make the Peppermint Patties....called Peppermint Creams in the book.
The recipe is very simple, 4 ingredients (and actually only 3 of them are necessary) total and voila!
You start with powdered sugar and a lightly beaten egg white (it should be a little frothy-looking). It'll be runny at first:

Then, as you add more powdered sugar, it'll become more thick....so thick and chunky and dry-looking that you won't be able to stir it with a fork any longer:

After this point, you can add in the peppermint extract (or you could be really daring and use another kind of extract) and the food coloring (optional). You'll need to start working the dough with your hands until you get a nice "doughy" ball that is evenly colored (if you used dye) and smooth:

Now, this is where I deviated in a big way from the recipe (other than the fact that I never measured the powdered sugar. *smile*
The recipe says to roll the dough out and cut the circles with cookie cutters. I thought that I'd end up wasting a lot of the 'dough' that way, since the dough will dry out quite quickly, I probably wouldn't be able to reuse the scraps after cutting the first set. So, to alleviate this problem, I just pulled off little bits of the dough and rolled them into balls.

I used a small glass cup and dipped it into some powdered sugar and then flattened the balls. Yes, the edges will be cracked (but I didn't care), unless you flatten the balls as you go. Then they wouldn't have time to dry slightly on the edges and would be easier to flatten without cracking.

Now, you can stop here and end up with something similar to those "after-dinner mints" that come in those pastel colors...but I wanted chocolate! So, we decided to dip half of them into some semisweet chocolate. Which, I think, made them look pretty anyway.....and of course everything tastes better with chocolate.

We were able to get 26 little mints out of one batch. The recipe never says how many they 'suggest' you'll get out of it.
Here is their recipe:
1 3/4 C powdered sugar
1 free-range egg white
peppermint extract
food coloring (optional)
1. Lightly grease a large piece of waxed paper. Sift approximately two-thirds of the sugar into a mixing bowl. Lightly whisk the egg white with a fork until it is lightly frothy. Pour the beaten egg white into the icing sugar, add a few drops of peppermint extract, and mix with a fork until all the ingredients are combined.
2. Add the remaining sugar a little at a time and continue mixing until the dough is too stiff to mix with a fork. Finish mixing with your hands until the mixture has a doughy consistency. Taste and add more peppermint, if necessary. Keep your hands dusted with sugar so that the mixture doesn't stick to your fingers. Add a few drops of food coloring if desired.
3. Dust your work surface with powdered sugar and roll out the dough to a thickness of 1/2 inch. With a small round cutter, cut out the peppermint creams and lay them on the sheet of waxed paper to dry.
Enjoy!
-Erica
Monday, April 27, 2009
Chocolate Almond Kahlua Cheesecake
Me? I went for something different than I've ever made before....and it was yummy!
The April 2009 challenge is hosted by Jenny from Jenny Bakes. She has chosen Abbey's Infamous Cheesecake as the challenge.
So, we pretty much had tons of freedom on this challenge. We could add flavors, change crust, etc. Which was fun....and interesting. To see what the other Daring Bakers came up with (and there are some truly phenominal creations), go here.
So, I started with the basic recipe and added 1/4 C of cocoa powder. For the vanilla, I substituted almond extract and for the liquer, I used French Vanilla Kahlua. YUMMY!
Once I had the crust ready, I sprinkled white chocolate chips over it. Then covered it with the cheesecake mixture.

Once it was set and ready....I covered it with a chocolate almond ganache. So delightful, really. Then, for just one more OOMPH! I sprinkled more white chocolate chips on top of the ganache (before it had set, of course).

This recipe is fantastic! The cheesecake is creamy....sets perfectly....and did you notice....NO CRACKS! I have been using a "water-bath-like" method for a long time to prevent cracks in my cheesecakes. I did it the same way this time.....just put a pan of hot water on the shelf below my cheesecake....BUT I put the pan of water in as soon as I turn the oven on for pre-heat. That way it gets the oven ready for my cheesecake. I find this to be a great method.
One last beautiful shot:

Here is the recipe we used (you should try it and get creative on your own!)
Abbey's Infamous Cheesecake
crust:
2 cups / 180 g graham cracker crumbs
1 stick / 4 oz butter, melted
2 tbsp. / 24 g sugar
1 tsp. vanilla extract
cheesecake:
3 sticks of cream cheese, 8 oz each (total of 24 oz) room temperature
1 cup / 210 g sugar
3 large eggs
1 cup / 8 oz heavy cream
1 tbsp. lemon juice
1 tbsp. vanilla extract (or the innards of a vanilla bean)
1 tbsp liqueur, optional, but choose what will work well with your cheesecake
DIRECTIONS:
1. Preheat oven to 350 degrees F (Gas Mark 4 = 180C = Moderate heat). Begin to boil a large pot of water for the water bath.
2. Mix together the crust ingredients and press into your preferred pan. You can press the crust just into the bottom, or up the sides of the pan too - baker's choice. Set crust aside.
3. Combine cream cheese and sugar in the bowl of a stand-mixer (or in a large bowl if using a hand-mixer) and cream together until smooth. Add eggs, one at a time, fully incorporating each before adding the next. Make sure to scrape down the bowl in between each egg. Add heavy cream, vanilla, lemon juice, and alcohol and blend until smooth and creamy.
4. Pour batter into prepared crust and tap the pan on the counter a few times to bring all air bubbles to the surface. Place pan into a larger pan and pour boiling water into the larger pan until halfway up the side of the cheesecake pan. If cheesecake pan is not airtight, cover bottom securely with foil before adding water.
5. Bake 45 to 55 minutes, until it is almost done - this can be hard to judge, but you're looking for the cake to hold together, but still have a lot of jiggle to it in the center. You don't want it to be completely firm at this stage. Close the oven door, turn the heat off, and let rest in the cooling oven for one hour. This lets the cake finish cooking and cool down gently enough so that it won't crack on the top. After one hour, remove cheesecake from oven and lift carefully out of water bath. Let it finish cooling on the counter, and then cover and put in the fridge to chill. Once fully chilled, it is ready to serve.
Pan note: The creator of this recipe used to use a springform pan, but no matter how well she wrapped the thing in tin foil, water would always seep in and make the crust soggy. Now she uses one of those 1-use foil "casserole" shaped pans from the grocery store. They're 8 or 9 inches wide and really deep, and best of all, water-tight. When it comes time to serve, just cut the foil away.
Prep notes: While the actual making of this cheesecake is a minimal time commitment, it does need to bake for almost an hour, cool in the oven for an hour, and chill overnight before it is served. Please plan accordingly!
Some variations from the recipe creator:
** Lavender-scented cheesecake w/ blueberries - heat the cup of heavy cream in the microwave or a saucepan until hot but not boiling. Add 2 tbsp of lavender flowers and stir. Let lavender steep in the cream for about 10-15 minutes, then strain the flowers out. Add strained cream to cheesecake batter as normal. Top with fresh blueberries, or make a quick stovetop blueberry sauce (splash of orange juice, blueberries, a little bit of sugar, and a dash of cinnamon - cook until berries burst, then cool)
** Cafe au lait cheesecake with caramel - take 1/4 cup of the heavy cream and heat it in the microwave for a short amount of time until very hot. Add 1-2 tbsp. instant espresso or instant coffee; stir to dissolve. Add this to the remainder of cream and use as normal. Top cheesecake with homemade caramel sauce (I usually find one on the food network website - just make sure it has heavy cream in it. You can use store-bought in a pinch, but the flavor is just not the same since its usually just sugar and corn syrup with no dairy).
** Tropical – add about a half cup of chopped macadamias to the crust, then top the cake with a mango-raspberry-mandarin orange puree.
** Mexican Turtle - add a bar of melted dark chocolate (between 3 and 5 oz., to taste) to the batter, along with a teaspoon of cinnamon and a dash of cayenne pepper (about 1/8 tsp.). Top it with pecan halves and a homemade caramel sauce.
** Honey-cinnamon with port-pomegranate poached pears – replace 1/2 cup of the sugar with 1/2 cup of honey, add about a teaspoon or more (to taste) of cinnamon. Take 2 pears (any variety you like or whatever is in season), peeled and cored, and poach them in a boiling poaching liquid of port wine, pomegranate juice/seeds, a couple of "coins" of fresh ginger, a cinnamon stick, and about a 1/4 cup of sugar. Poach them until tender, then let cool. Strain the poaching liquid and simmer until reduced to a syrupy-glaze consistency, then cool. Thinly slice the cooled pears and fan them out atop the cooled cheesecake. Pour the cooled poaching syrup over the pears, then sprinkle the top with chopped walnuts and fresh pomegranate seeds.
Some variations from Jenny (from JennyBakes):
**Key lime - add zest from one lime to sugar before mixing with cream cheese. Substitute lemon juice, alcohol, and vanilla with key lime juice.
**Cheesecakelets - put in muffin tins, ramekins, or custard cups. Try baking 20-35 minutes, or until still a little jiggly, and cool as before.
Enjoy!
-Erica
Friday, April 24, 2009
Gooey Turtle Brownies
Need I really say more?
I love brownies. I love chocolate. I love caramel. I love nuts....any kind of nuts, just about. When you put them all together, it is a celebration.

These brownies are not for the faint-hearted. These are chewy, gooey, rich, decadent, fudgy brownies. Mmmmmmm.
I started with a double chocolate brownie base with pecans. Two kinds of chocolate in there, my dear. Sprinkled with chocolate morsels and pecans.

I baked them for about 40 minutes....they looked delightful straight out of the oven. I could barely keep my hands off of them!

Oh, but this is where it gets *really* good.

Bring on the CARAMEL! Lots of it!
After the caramel set, I smothered them in even more chocolately goodness. A rich chocolate ganache. Delightful.
I was so anxious, I didn't wait for them to cool all the way. I know, I know....shame on me. But, I'm willing to bet you would've done the same thing. Let's be honest. Yeah, I thought so.

Double-Chocolate Brownies
2 oz. unsweetened chocolate
2 oz. semisweet chocolate
1 C butter, softened
2 C sugar
4 large eggs
1 C all-purpose flour
1/2 tsp salt
2 tsp vanilla
3/4 C chopped toasted pecans
3/4 C semisweet chocolate morsels
Preheat oven to 350 F. Microwave chocolate in a small bowl at MEDIUM for 30-second intervals until melted. Stir chocolate until smooth.
Beat butter and sugar at medium speed with an electric mixer until light and fluffy. Add eggs, 1 at a time, beating just until blended after each addition. Add melted chocolate, beating just until blended. Add flour and salt, beating at low speed just until blended.
Stir in vanilla, 1/2 C pecans, and 1/2 C chocolate morsels. Spread batter into a greased and floured 13 X 9 pan. Sprinkle with the remaining 1/4 C pecans and 1/4 C chocolate morsels.
Bake at 350 F for 40 minutes or until set. Cool completely on a wire rack. Cut into squares.
YIELD: 32 brownies
Note: Freeze brownies in an airtight container for up to 1 month.
After my brownies set, I poured the caramel and chocolate ganache over them.
For the caramel:
12 caramels, unwrapped
1 Tb heavy cream
Melt over low heat, stirring often, in a small saucepan. Pour over brownies.
For the ganache:
1/4 C semisweet chocolate
1 Tb heavy cream
1 tsp vanilla
Melt over low heat, stirring often, in a small saucepan. Pour over caramel.
Enjoy!
-Erica
Monday, April 20, 2009
Blueberry Crumbcake Pancakes
So, I took Joy's recipe into the kitchen with me and got to mixing.
Here is the finished plate:

Delicious, no? YES!
From the blueberries, cinnamon, and brown sugar IN the batter.....all the way to that delightful crumb/streudel topping.....then drizzled with maple syrup.
Talk about Heaven. Mmmmmmm.
If you would like to try your hand at these, here ya go:
Blueberry Crumbcake Pancakes
(modified from Oatmeal Cookie Pancakes, Joy the Baker)
2 eggs
2 C buttermilk
4 Tbsp butter, melted
1/2 tsp vanilla extract
1 1/2 C all-purpose flour
1/2 C old fashioned oats
2 Tbsp brown sugar
2 tsp baking powder
1 tsp baking soda
1 tsp salt
1 tsp cinnamon
dash of nutmeg
1 C blueberries
(oil, butter, or cooking spray for the pan)
Step 1: In a large bowl, beat eggs. Add buttermilk, butter, and vanilla; mix well. Add flour, oats, sugar, baking powder, baking soda, spices, and salt. Mix well until mostly smooth. Fold in blueberries and let batter set for a few minutes.
Step 2: Heat griddle or pan over medium heat. Add a tsp of oil or butter to pan (or spray with cooking spray). You can test to see if the pan is hot enough by adding a few drops of water, when the water drops start to dance, its hot enough.
Step 3: Pour 2 Tbsp of batter onto the griddle. Cook on the first side until bubbles that form start to pop. You can also gently lift up the pancake to make sure the bottom is not overcooking, if it is the pan may be too hot and you will need to adjust the heat. Flip the pancake over with a spatula and cook until golden brown. Repeat until all the batter is gone. Let cooked pancakes rest on a heat proof plate in a 200 degree F over until ready to serve.
Step 4: Serve pancakes in stacks with a dollop of butter, drizzled with maple syrup, and topped with streudel crumbs.
Streudel Crumbs
1/4 C oats
1/2 tsp cinnamon
dash of nutmeg
1 Tbsp brown sugar (packed)
1 1/2 Tbsp butter or margarine, softened
Mix ingredients together with a fork until it resembles coarse crumbs.
Sprinkle on top of your pancakes.
*You can adjust the quantity of any ingredient to suit your personal tastes.

Enjoy!
-Erica
Sunday, April 19, 2009
Sunday Spotlight: Omnomicon

Ok, so moving on.....I was browsing the internet, looking for a blog to highlight today, when I found this site called Tastespotting. I was awe-stricken. A place that I can just look at all kinds of glorious food! Well, I came across this beautiful piece of cake, Daffodil Cake. I thought to myself, "I'd love to try that cake!" Then I proceeded to peruse the blog that it came from. I love this girl! She is hilarious, I cannot tell you the number of times that I actually laughed out loud and said, "Me too!".
Now, I have decided that I'm definitely doing the Sunday Spotlight on her....but to find a few other things that I'd like to try. Well, that did not take long, let me tell you! She had the most beautiful cake I have ever seen on there...and I stopped dead in my tracks (Ok, well I was sitting....but you know what I mean!). I walked through the recipe and knew I had every ingredient on-hand. That was it!
I give you.....RAINBOW CAKE:
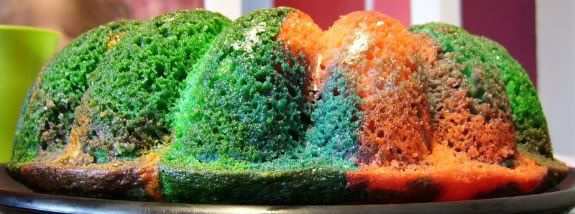
Beautiful, isn't it?
Don't worry, I have PLENTY of other shots of it that I WILL be sharing, so you'll get to see lots more of it's wonder! *smile*
My daughter, Syndel, walked in right as I was printing the recipe out and said, "Oh, Mommy! Can I help you make that pretty cake?" How was I going to turn down a girl who obviously loves color (and baking) as much as me? Well, I couldn't.
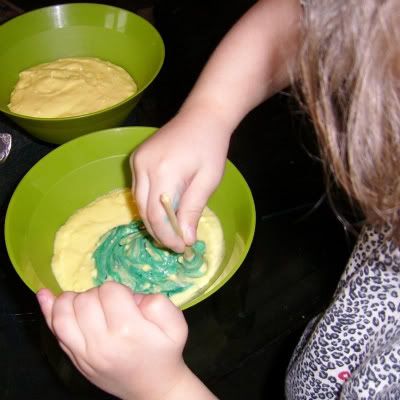
So, Syndel and I got to mixing:
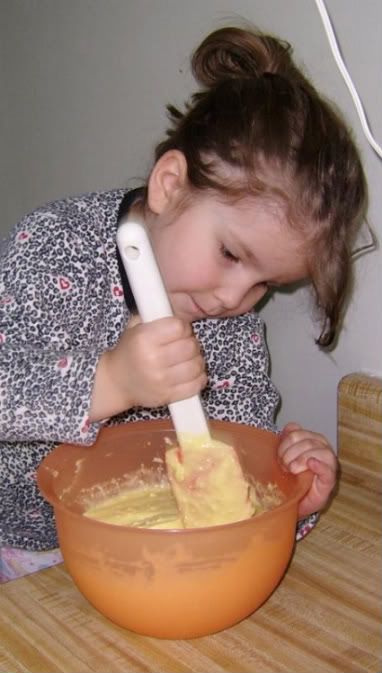
She thought that part was fun, but this is what really got her pumping:
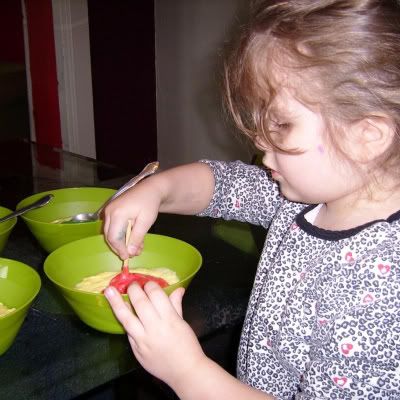
All those glorious colors.....just beautiful!
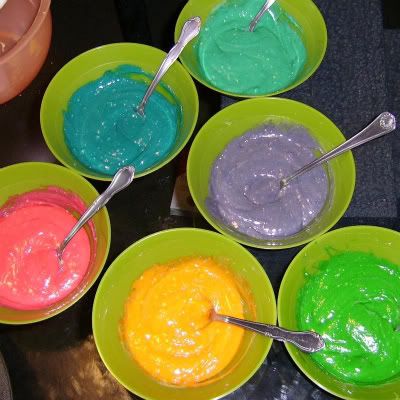
Now, I know, I know....we didn't have the "real" rainbow colors, so we just made do with what we did have.....6 gorgeous colors....just not all found in the "traditional" rainbow. And that is OK by both of us....I checked.
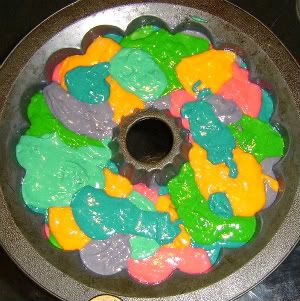
So, we didn't really care about the layering effect, we just wanted something pretty....so we just did spoonfuls of the different colors into the bundt pan:
Syndel sat at the oven door for most of the time it was baking. She kept turning the light on to check on it and such. So cute....and reminds me a lot of when I was young. I've always had a passion for everything in the kitchen....baking, cooking....anything.
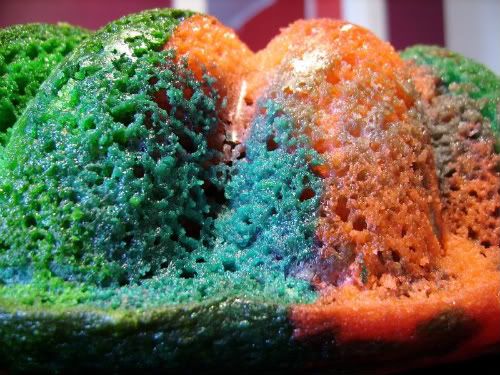
When it came out, we both "oooohed and aaaahed" over it. Phenominal! I tell you....really. Look closely......beautiful, yeah?
So, naturally, we were even more excited to cut into that baby! Syndel and I hovered over the cake, we could already picture the beauty that we were about to witness in our little minds......
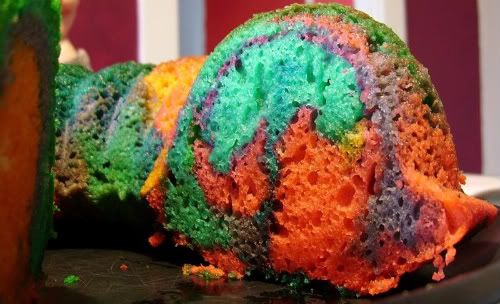
Syndel squealed with delight....I held mine back just slightly and gasped. *giggle*giggle* Really, I have never seen such a beautiful cake! Have you? Really now, let's be honest!
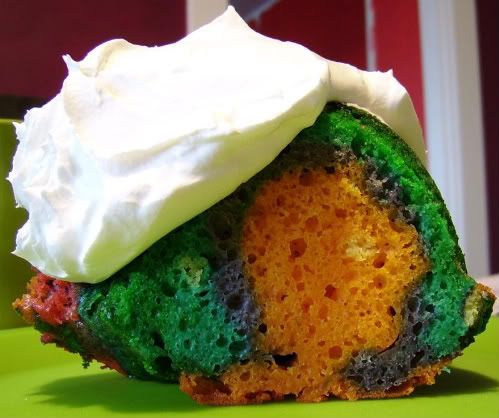
I was so moved by it, I almost didn't want to eat it.....almost. But now I needed to know if it tasted as wonderful as it looked.
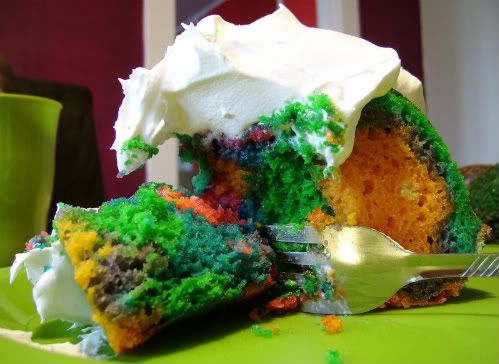
.....and it did!
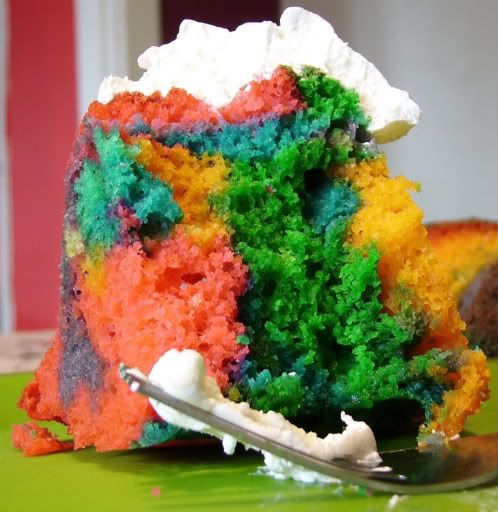
I couldn't help but take a ton of pictures of it. Everytime I took another bite, I smiled, excitedly, because I thought it was even more pretty than before!
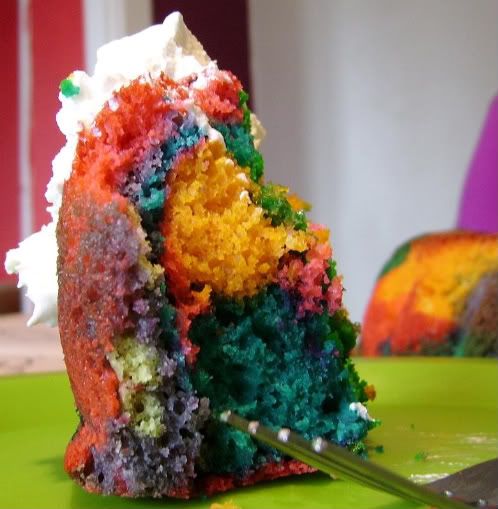
Fabulous!
Ok, so for the complete recipe for this darling.....go here and visit Omnomicon. I think she is pretty great and you probably will too.
Enjoy!
-Erica

Tuesday, April 14, 2009
Lemon Ricotta Pancakes

Courtesy of Jenny Bakes, I have made Lemon Ricotta Pancakes. Honestly, I have never heard of such a combination before, especially for pancakes....but it sounded interesting enough for me to try it.
Now, my hubby is pretty weird when it comes to trying things that you wouldn't normally think to put together, so I have to approach him carefully with things like this. *giggle giggle* Which means, I omit the fact that there is an uncommon ingredient in the recipe. *smile*
So, I started mixing it up in the kitchen, keeping hubby at bay while I threw in the ricotta cheese.

The batter came together beautifully and it was light and fluffy. I couldn't wait to try them! They didn't really take much longer than my normal pancake recipe, so hubby didn't really suspect anything. *giggle giggle* (I know, I'm so cruel)
Now, I had some left over blueberries from that awesome scone recipe I tried the other day....so I decided to put some of them on top of the pancakes after they were finished.
Beautiful, don't you think?

Ok, so my hubby took ONE bite of them and.....
"Ooooh. Mmmmmm. Honey, what did you do? These pancakes are THE best pancakes I've ever had in my life. Fabulous."
So, naturally I start laughing....evil-like, too. Now he is curious.
We stare each other down a little, but he can't keep his fork out of those pancakes, he is still shoveling them in....even though he now knows there must be something weird in them. *giggle giggle*
Alright, well I laid it on him.
"Lemon Ricotta Pancakes. I got the recipe from this blog that I like."
"Well, keep that recipe. Can you make them again tomorrow?"
He was right, too, THE best pancakes I have ever had in my life. We didn't even add butter or very much syrup, which is very unusual for us.
Thanks Jenny for an awesome recipe! We'll be having them again....soon.
Enjoy!
-Erica